
How to Organize a Garage: A Complete System That Actually Works
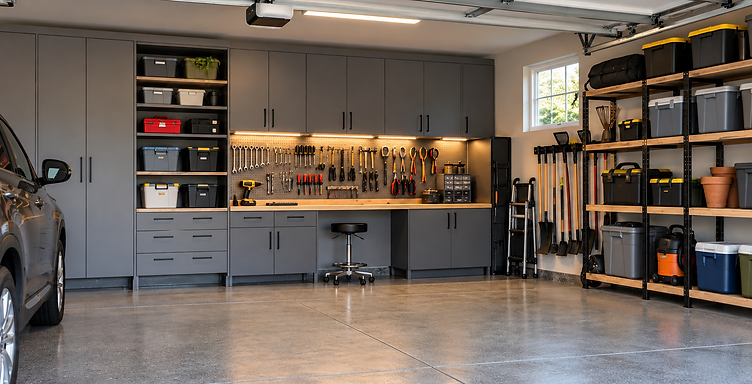
If you've ever searched "garage organization," you already know the drill: buy matching bins, hang a pegboard, label everything, use vertical space. It's not wrong advice — it's just advice that doesn't actually explain why most garage systems fall apart within a year after being set up.
Here's the real problem: garages aren't closets. They swing through 40+ degrees of temperature, get vibrated every time the garage door opens, and function as a one-way valve where stuff goes in and almost never comes back out. A storage system that ignores those realities looks great on install day and is a disaster by the following summer.
This guide skips the stuff you've already read a dozen times and focuses on the parts of a garage system that actually determine whether it holds up — shelving, cabinets, pegboard, bins, and labeling, each with the mistakes that quietly undo them.
Shelving: Solve for the Load Path, Not the Photo Most people size their shelving for what they own today. Then six months later there's a stack of paint cans or a 40-lb bag of water softener salt sitting on a shelf that was never rated for it, sagging in the middle because the span between supports is too wide for the weight. Before you buy anything, do this:
- Check the weight rating per shelf, not per unit. A shelving unit rated for "800 lbs" often means 800 lbs total across 4-5 shelves — not 800 lbs on the one shelf where you're about to store cans of paint and cat litter.
- Match shelf depth to your heaviest items, not your average item. A single 24" deep shelf holding a 5-gallon bucket in the back and empty space in front is wasted structural capacity. Put your heaviest, deepest items on the shortest-span shelves.
- Think in two tiers: working storage and archive storage. Anything you touch monthly should live at torso-to-eye height on shelving you can access without a step stool. Anything seasonal (holiday bins, off-season gear) belongs up high or in the rafters — the hardest-to-reach spot in the garage should be your least-used stuff, not wherever there happened to be room.
One more thing nobody mentions: measure your car door swing and mirror clearance before you install anything deeper than 12" along the wall next to where you park. It's an extremely common — and extremely annoying — mistake to build out 24" deep shelving that clips your side mirror or blocks the door from opening fully.
Cabinets: Buy for Your Inventory, Not the Showroom Kit Modular garage cabinet systems look fantastic in the marketing photos, and that's exactly the trap. Those kits are designed to look coordinated on a showroom wall — they're not designed around what's actually in your garage.
A few things worth knowing before you buy:
- Base cabinets are often built to kitchen-cabinet depth (24"), but most garage items don't need that much depth. If you're storing small hardware, sprays, and hand tools, that extra depth just becomes a black hole where things get pushed to the back and forgotten. Look for cabinets with adjustable shelving so you can close that gap.
- Material matters more in a garage than anywhere else in your house. Unconditioned garages swing in humidity and temperature far more than living spaces. Particleboard and MDF cabinets — the cheapest and most common option — can swell, warp, or delaminate over a few seasons. Metal or marine-grade plywood cabinets cost more up front but won't quietly fail after two winters.
- If you store anything you don't want a curious kid or pet getting into — pesticides, automotive chemicals, sharp tools — a cabinet with an actual lock (not just a latch) is worth the extra cost. It's a detail that rarely comes up in organization content, but it's one of the few decisions here with real safety consequences.
Before you buy a kit, do a 10-minute inventory: pull everything you plan to store in cabinets into one pile, sort it by size, and then shop. It's not the fun way to do it, but it's the difference between a system that fits and one you're fighting with in a year.
Pegboard: The Failure Point Nobody Talks About Pegboard gets recommended constantly, but almost nothing gets written about why pegboard installations fail — and they do, more often than people expect.
- Standard pegboard needs a gap behind it to let the hooks seat properly, usually created with furring strips. Skip this step (or mount it flush to drywall) and hooks won't hold right, and the board will bow over time.
- Screw it in at more than the four corners. A pegboard held up by four screws sags in the middle within a year, especially in a garage where the door vibrates the whole wall every time it opens. Support it every 16 inches like you would drywall.
- Standard pegboard hooks are not rated for heavy tools. Circular saws, drills, and anything metal and dense will slowly enlarge the hole they're hung from until the hook pulls through. For anything heavier than hand tools, a slotted wall track or French cleat system distributes weight across a rail instead of a single small hole, and it's worth the upgrade for your heavier gear.
- Place your most-used tools in what's sometimes called the "golden triangle" — within arm's reach of wherever you actually work, not spread evenly across the whole board for visual symmetry. If your workbench is on the left wall, your most-grabbed tools shouldn't be pegged on the right wall just because that's where the empty space is.
Bins: The Aesthetic Trap
The uniform-bin look is everywhere in garage organization content, and it does look great in photos. But a few practical issues get glossed over:
- Stack height has a real weight limit, and it's lower than you'd guess for plastic bins. Read the manufacturer's stack rating before you build a six-bin-high tower — a lot of "organized" garages have one bad stack away from a collapse.
- Clear bins help you find things faster, but they yellow and become brittle from UV exposure over a few years in an unconditioned garage, especially near windows or a garage door with glass panels. If long-term durability matters more to you than being able to see contents at a glance, opaque bins with good labels will outlast them.
- Oversized bins are where small parts go to disappear. A single large bin labeled "hardware" becomes a place where screws sink to the bottom under everything else. Smaller, size-matched bins for small parts (with dividers, if needed) beat one big bin every time — bigger isn't more organized, it's just a bigger pile.
- For anything you rotate seasonally — holiday decorations, camping gear — a bin on a small furniture dolly or wheeled base saves you from hauling it down off a high shelf twice a year.
Labeling: Label the Question, Not the Contents
"Label everything" is true but incomplete advice. The more useful version: label bins by the problem they solve, not by their literal contents.
If you're standing in the garage trying to fix a hole in the drywall, you're not thinking "I need spackle, tape, and 120-grit sandpaper" — you're thinking "I need to patch this wall." A bin labeled "Drywall Repair" gets found in two seconds. A bin labeled "Spackle, Tape, Sandpaper, Corner Bead" makes you read and translate before you even know if it's the right bin. Organize your labels around the task, and let the contents be the detail people find once they've already picked the right bin.
A couple of practical notes that rarely make it into these lists:
- Labels degrade. Sharpie on masking tape fades and peels within a season or two in a garage's temperature swings. A basic label maker with laminated tape costs very little and holds up for years — worth the small upgrade if you're doing this once and want it to last.
- If you ever plan to file a homeowner's insurance claim after a storm or theft, a labeled, photographed garage inventory is genuinely useful documentation — something worth doing once your system is in place, even though it has nothing to do with finding your drill.
The System That Actually Sticks
The common thread through all five of these: most garage organization fails not because people didn't buy the right products, but because the system was built for how the garage looks on install day, not for how weight, humidity, and daily use actually behave over time.
Before you buy anything, spend one week just tracking what you actually reach for — what you grab constantly, what you haven't touched in a year, what's currently stacked somewhere awkward because there was nowhere else to put it. That week of paying attention will tell you more about what your garage needs than any product list, including this one.
Ready to build it out but don't want to spend your weekend fighting a stud finder and a level? Wingman Handyman Services installs full garage systems — shelving, cabinets, pegboard, and wall track — sized to what you actually own, not a showroom kit. [Book a free estimate] and we'll help you build a system that's still working a year from now, not just on day one.
WINGMAN SERVICES
Rather have Wingman do it?
Get a quote and let a pro handle it. Your weekend stays yours.